
- Preparation:
- Strip the Cable: Carefully strip the LMR-200 cable to expose the central conductor and the shield. This involves removing the outer jacket and shielding, and then preparing the dielectric and central conductor. Follow the manufacturer’s specifications for the correct strip lengths.
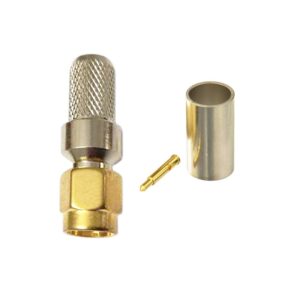
Prepare the Connector: Ensure the SMA right-angle connector is ready for crimping. This typically involves a connector body with a central pin and a crimp ring or ferrule.
Crimping Steps: - Insert the Central Conductor:
Insert the exposed end of the LMR-200 cable’s central conductor into the central pin of the SMA connector. Make sure the conductor is fully inserted and aligned properly.
Crimp the Central Pin:
Use a crimping tool to compress the crimp ring around the central pin. This creates a solid mechanical and electrical connection between the central conductor and the pin.
Prepare the Shield:
Fold back the shield (braid) of the LMR-200 cable to ensure it makes contact with the connector’s grounding element or body.
Crimp the Shield:
Slide the crimp ferrule (or ring) over the folded-back shield and use the crimping tool to compress it. This secures the shield to the connector’s grounding element, ensuring proper grounding and minimizing signal loss.
Final Steps:
Inspect the Connection: Verify that the crimped connections are secure and there are no loose parts or visible damage. The crimping should be clean, with no signs of deformation or improper contact.
Test the Connection: If possible, use RF testing equipment to check the connection for signal integrity and performance. Ensure that it meets the specifications for your application.
Reviews
There are no reviews yet.