Prepare the Cable:
– Strip the Cable: Use a coaxial cable stripper to remove approximately 1.5 to 2 inches (38 to 50 mm) of the outer insulation from the LMR-400 cable. Be cautious not to damage the braided shield beneath the outer insulation.
– Expose the Shielding: Fold back the braided shield (or foil shield) over the outer insulation. Make sure the shield is neatly folded back.
– Trim the Dielectric: Carefully trim the dielectric (the foam or insulating layer around the center conductor) so that approximately 1/4 inch (6 mm) of the center conductor is exposed.
Prepare the Connector:
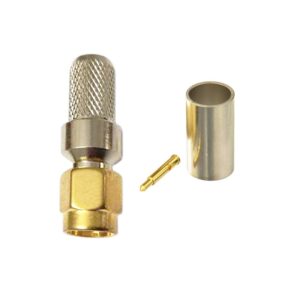
– Check Connector Components: The TNC male right-angle connector with a clamp mechanism typically includes a clamp ring, a crimp pin, and the connector body.
– Verify Compatibility: Ensure that the TNC connector is specifically designed to fit LMR-400 cable.
Insert the Crimp Pin:
– Crimp Pin: Slide the crimp pin onto the exposed center conductor of the LMR-400 cable. Ensure the pin is properly aligned and makes solid contact with the conductor.
– Crimp the Pin: Use your crimping tool to crimp the pin onto the center conductor. The crimping tool will compress the pin around the conductor to ensure a secure connection.
Attach the Connector:
– Clamp the Shield: Slide the clamp ring or clamp mechanism over the folded-back shielding. This clamp will secure the shielding to the connector.
– Insert the Cable: Push the cable (with the crimped pin) into the TNC male right-angle connector until it is fully seated.
– Clamp the Connector: Use the clamp tool (if provided) or the clamp mechanism on the connector to secure the shield in place and ensure a solid connection. Some connectors use a screw-on clamp or other mechanisms to ensure a tight fit.
Inspect the Connection:
– Check that the connector is securely attached and that there are no visible gaps or loose parts.
– Ensure that the cable is fully seated in the connector and that there are no exposed wires or shorts.
Test the Connection:
– If possible, use a network analyzer or similar testing device to verify the functionality and integrity of the connection.
Additional Tips:
– Use the Correct Tools: Ensure your crimping and clamp tools are specifically designed for TNC connectors and are in good condition.
– Accurate Stripping: Be precise with cable stripping to ensure a proper fit and connection.
– Practice: If you’re new to this process, practicing on spare cables and connectors can help improve your technique and avoid mistakes
The TNC Male Right Angle LMR 400 Clamp connector is designed for use with LMR 400 coaxial cables. It offers a right-angle design for flexible cable routing in tight spaces, and uses a clamp attachment method for secure connections. This connector supports RF applications up to 11 GHz and is ideal for telecommunications, wireless communication systems, and other high-frequency installations. The TNC Male Right Angle LMR 400 Clamp connector provides excellent durability and performance in demanding environments.
Weight
0.1 kg
Reviews
There are no reviews yet.
Be the first to review “TNC M RA LMR 400 CLAMP” Cancel reply


Reviews
There are no reviews yet.